Wallpaper can add style and personality to our walls, but there comes a time when we want to make a change or renovation to our home. Whether it’s because the wallpaper is worn, outdated or just doesn’t fit our current design vision, it’s important to know how to remove it properly.
The task of removing wallpaper can seem overwhelming, but with the right information and proper techniques, this process can be simpler than you might imagine.

In this article, we will explore step-by-step how to remove wallpaper at home, providing practical tips and effective strategies for a successful outcome.
From initial preparation to removing debris and preparing the walls for the next step, we’ll learn together how to get rid of wallpaper and make way for new design possibilities in our space. Get ready to discover that removing wallpaper can be an exciting and rewarding challenge in your home improvement journey!
Preparation before you begin.
Before we dive into the exciting process of how to remove wallpaper at home, proper preparation is crucial. These initial steps are essential to protect the floor and surrounding furniture, preventing damage and making the removal process easier.
First, we must be sure to protect the floor. Wallpaper can peel off in pieces or generate sticky residue, which can stain or damage different types of flooring, such as wood or vinyl. An effective option is to cover the floor with plastic sheeting or protective sheeting to prevent any unwanted damage or soiling. It is also advisable to secure the edges of the tarps with tape to keep them in place throughout the process.
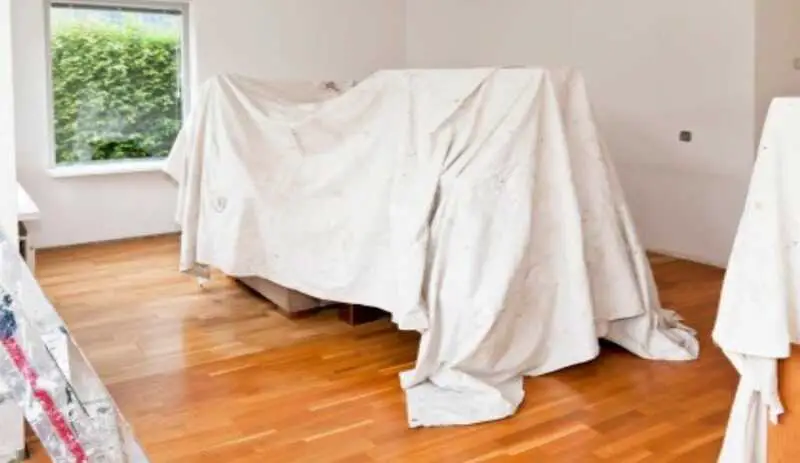
In addition to the floor, our furniture may also be at risk of damage or staining during wallpaper removal. It is wise to move the furniture away from the walls and cover it with sheets or protective covers. This will provide an additional layer of safety and prevent soiling or damage from possible water splashes or wallpaper residue.
Tools needed.
To successfully carry out the task of how to remove wallpaper at home, it is essential to have the right tools. These specific tools and materials will allow us to tackle the removal process efficiently and without damaging the surfaces.
One of the essential tools is the stainless steel spatula. The spatula, preferably made of stainless steel, will help us to detach and scrape the wallpaper from the wall. It is important to choose a properly sized spatula that fits comfortably in the hand, which will make the job easier and minimize fatigue.
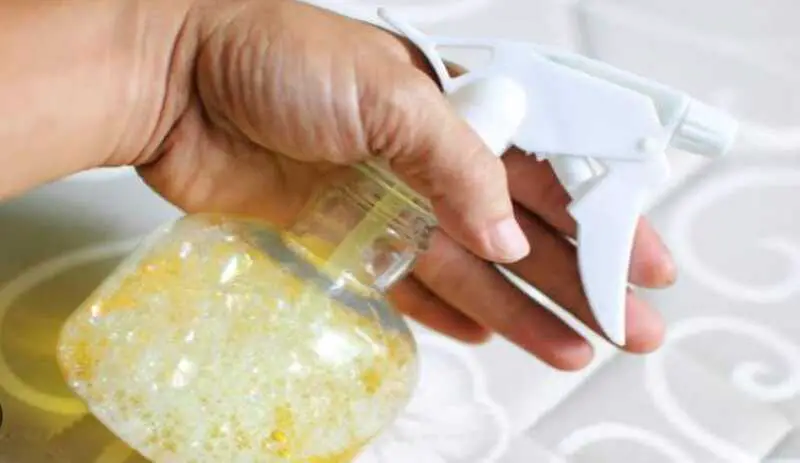
Another useful tool is the water sprayer. Spraying water on the wallpaper will soften the adhesive, making it easier to remove. A water atomizer will allow us to distribute the water evenly and in a controlled manner, avoiding excess moisture on the wall and reducing the risk of damaging it.
In addition, a scraper or wall scraper will be essential. This tool will help us to remove any wallpaper residue that may remain adhered to the wall after the main layer has been removed. A scraper with a sharp but not too aggressive blade is ideal for this task.
In addition to these main tools, it can be helpful to have other items on hand such as absorbent rags, soft cloths and buckets to dispose of the residue. These additional materials will help us to keep the work area clean and tidy throughout the process.
Preparing the wallpaper.
Before diving into the exciting process of how to remove wallpaper at home, it is crucial to properly prepare the wallpaper before you start removing it. This preparation step is critical to facilitate removal and ensure better results.
One commonly used method is wallpaper punching. This involves using a pointed tool, such as a pick or small spatula, to make small holes in the paper. These holes will allow liquids or chemicals to penetrate and soften the underlying adhesive, making removal easier. It is important to be careful when drilling to avoid damaging the underlying wall.
Another approach is to use special chemicals designed to loosen the wallpaper adhesive. These products, available at home improvement stores, are applied directly to the wallpaper and left to act for a specified period of time. The chemicals help dissolve the adhesive, making it easier to remove later. It is essential to follow the manufacturer’s instructions and take safety precautions when handling and applying these products.
By preparing the wallpaper in this manner, either by drilling or using special chemicals, we will be paving the way for a smoother and more efficient removal process. These techniques will help weaken the adhesive and soften the wallpaper, making it easier to remove later. Remember to be cautious and follow proper instructions to avoid damaging the underlying wall and achieve the best results.
Wallpaper removal.
Once we have properly prepared the wallpaper, it is time to get into the removal process. There are two common methods for removing wallpaper: the wet and scrape method, and the use of steam. Below, I will provide detailed instructions on each.
The wet-and-scrape method involves spraying water or a liquid solution on the wallpaper to soften the adhesive and make it easier to remove. To do this, we can use a water sprayer to spray warm water on the wallpaper, or mix warm water with a small amount of detergent or vinegar in a bucket and apply the solution with a sponge or roller. It is important to make sure the wallpaper is well soaked, but without excess water that could damage the wall.
Once the wallpaper is wet, we must let the moisture act for a few minutes, allowing the adhesive to loosen. This varies depending on the type of wallpaper and the amount of adhesive used, so it is important to be attentive and verify the ease of removal.
After waiting the appropriate time, we can begin to scrape the wallpaper with a spatula. Starting from one edge, we should gently slide the spatula under the paper and push down, working in small sections. It may be necessary to apply more water or liquid solution during the process if the adhesive dries out again.
As for the use of steam, a tool called a wallpaper steamer or a steam machine is used. These tools release hot steam that penetrates the wallpaper, loosening the adhesive and making it easier to remove. We must slowly slide the steamer or steam machine nozzle over the wallpaper, making sure to cover all areas.
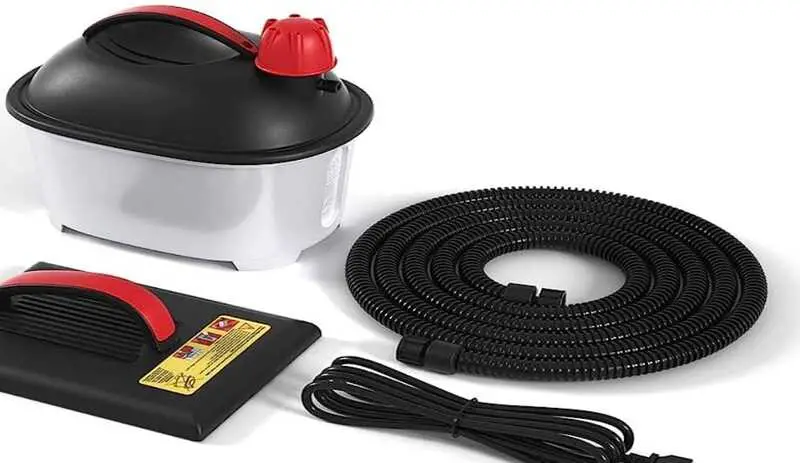
Once the wallpaper has been loosened with steam, we can proceed to scrape it off with a putty knife. As with the wet and scrape method, we must work in small sections and be careful not to damage the underlying wall.
Whether we choose the wet and scrape method or the steam method, it is important to remember that each technique requires patience and care. The process may need to be repeated on problem areas or with multiple layers of wallpaper.
Wall repair and preparation.
Once we have completed the process of removing the wallpaper, it is important to devote time and attention to repairing and preparing the wall for the next step. Whether we plan to paint it or apply a new coating, following a few key instructions will help us achieve a clean and durable finish.
The first step is to assess the condition of the wall after removing the wallpaper. Imperfections, such as small holes or cracks, may have been exposed during the removal process. These imperfections should be repaired before proceeding with painting or re-covering.
To fix small holes or cracks, we can use wall putty. We apply the putty with a putty knife, carefully filling each imperfection and smoothing the surface so that it is level with the rest of the wall. Once the putty has dried, lightly sand the repaired area with fine-grit sandpaper to obtain a uniform surface.
If the imperfections are larger or there is structural damage, such as extensive cracks or damaged areas, a more advanced approach and the help of a professional may be required. In these cases, it is advisable to seek expert advice to ensure proper and safe repair.
After the imperfections have been repaired, it is time to prepare the wall for the next step. If we plan to paint it, it is important to clean the surface of any wallpaper, adhesive or dust residue that may have been left behind during removal. A damp cloth or mild cleaning solution can be helpful in removing any remaining dirt.
If we choose to apply a new covering, such as a wall covering or decorative panels, it may be necessary to lightly sand the surface to ensure better adhesion. Gentle sanding will allow the new material to properly adhere to the wall and ensure a uniform finish.
It is important to note that the process of repairing and preparing the wall may require time and patience. It is essential to dedicate sufficient time to this step for optimal and long-lasting results.
Safety tips and precautions.
When embarking on this type of project, it is essential to keep in mind some practical tips and safety precautions to ensure a safe and secure working environment.
First of all, we must protect ourselves adequately. It is advisable to wear protective gloves, preferably rubber or latex, to avoid any direct contact with chemicals, adhesives or wallpaper residues. In addition, it is important to wear protective goggles to safeguard our eyes from any loose particles or accidental splashes during the process.
Another fundamental aspect is to work in a well-ventilated area. When removing wallpaper, paper particles, dust or chemical fumes may be generated. Opening windows and doors, or using fans, will help keep the air fresh and remove any irritants or harmful substances that may be released during the process.
In addition, it is important to ensure that electricity is disconnected in areas where work is being done. Avoiding accidental contact with electrical plugs or wires is essential to minimize any risk of electrocution or short circuits.
It is also recommended to cover furniture or items that cannot be moved out of the room with protective sheets or blankets to avoid soiling or damaging them during the wallpaper removal process. Protecting the floor with plastic sheeting or plastic tarps is also important to prevent stains or damage from water or chemicals used.
In addition to these specific precautions, it is essential to maintain a general attitude of caution. Paying attention to our posture and avoiding sudden movements can help prevent physical injury during the process. If at any time we feel uncomfortable or unsure, it is best to stop and seek additional advice or assistance.
By following these practical tips and safety precautions, we will be creating a safe and secure work environment throughout the entire wallpaper removal process. Safety should always be our top priority for a successful and uneventful outcome.
Remember, if you have any questions or concerns, do not hesitate to consult professionals or seek additional information to ensure a safe and satisfactory experience while removing wallpaper at home.
