Latest articles
Importance of crop rotation in your garden
In this post, we’ll explore the importance of crop rotation in your garden, a secret jealously guarded and that we will now share with you.
How to install geotextile fabric in your garden
September 8, 2023How to install closet hooks
September 8, 2023How to clean nonstick pans correctly
September 4, 2023Importance of gas leak detection systems
September 4, 2023Cleaning
How to clean nonstick pans correctly
In this post, we’ll explore how to clean nonstick pans properly. From the right steps after cooking to home tricks for effective cleaning.
Importance of shelves inside the bathroom
In this article, we will explore the importance of shelves in the bathroom and how they can make a huge difference in our day-to-day lives.
The best way to bleach corduroy shoes
July 11, 2023How to remove grease stains from clothes
July 10, 2023How to clean white plastic chairs
July 6, 2023How to clean stainless steel jewelry
July 6, 2023How to remove adhesive tape residues easily
July 3, 2023How to clean wine glasses properly
July 3, 2023DIY Projects
How to make an efficient removal
In this article, we will discover how to make an efficient move, saving time, energy and stress along the way.
Best way to place a sofa in the living room
In this article, we will explore the best way to place a sofa in the living room, taking into account some practical considerations.
How to repair frayed carpet edges.
February 22, 2022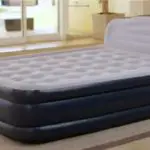
How to patch the fabric side of an air mattress
February 14, 2022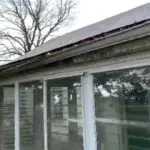
How to Fix Bent Gutters
February 4, 2022
How to remove a stripped screw inside a wooden cavity
February 4, 2022
What to do if you detect a gas leak at home
February 3, 2022Home Improvement
How to install closet hooks
In this post, we will teach you the steps on how to install hooks in your closet, allowing you to make the most of your space and your time.
How to properly store food in the pantry
This article will guide you through a series of logical and simple techniques on how to properly store food in the pantry.
Importance of automatic pet feeders
August 24, 2023How to install a backsplash in the kitchen
August 21, 2023How to install a pet door
July 28, 2023How to maintain a garage door
July 28, 2023How to renew a house front door
July 28, 2023How to install gutter guards
July 26, 2023Pest Control
Importance of pest control for household foods
In this post, we will explore the importance of pest control for household food. From the risks to the practices to prevent their growth.
How to exterminate a slug infestation
In this post, we’ll explore how to exterminate a slug infestation from cultural management practices to organic and technological solutions.
How to get rid of crickets at home
August 9, 2023How to eliminate and prevent head lice
August 9, 2023How to eliminate flying insects at home
May 30, 2023Does Raid kill maggots?
February 27, 2023Can worms eat through plastic garbage bags?
February 23, 2023Can mice open cabinet doors?
February 19, 2023Gardening
Importance of crop rotation in your garden
In this post, we’ll explore the importance of crop rotation in your garden, a secret jealously guarded and that we will now share with you.
How to install geotextile fabric in your garden
In this article, we will show you how to install geotextile fabric in your garden, revealing the secrets to a low-maintenance outdoor space.